Analyze footage
The Analyze Footage tab is where recordings actually get processed. A three-way mode switch at the top -- Project | Video File | Camera -- changes the whole tab. All three modes share the same processing engine and the same Inference Settings (the dialog is on every mode); what differs is what gets processed and how the outputs are tracked.
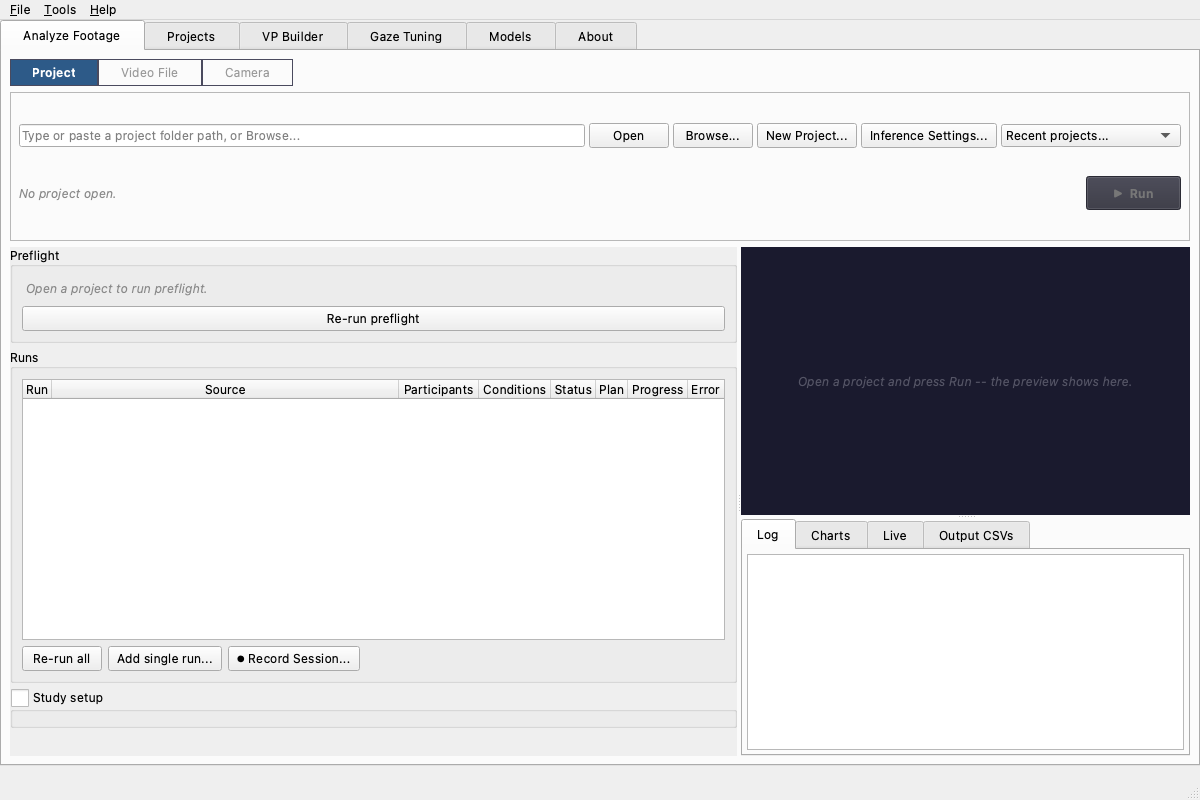
- Project -- open a study project and run the whole batch. This is where you spend almost all your time.
- Video File -- analyze a single video, no project, no metadata. A quick look at one recording.
- Camera -- record and analyze live from a webcam.
Project mode
Project mode runs a study project (see Projects and sessions). Open a project and the tab fills with:
- Preflight checklist -- a readiness check that runs every time you open a project (and on Re-run preflight). Green is fine, yellow is a warning you can usually ignore, red must be fixed before Run. Every message is explained in the tutorial's troubleshooting table.
- Runs table -- one row per recording, with participants, condition, status, and a resume plan (what Run will do to each row). Planned sessions show as awaiting recording.
- Study setup lives on the Projects tab -- the pipeline in use, the
project-wide participant map, and per-video conditions are edited in the
project overview (Projects tab) before running, and saved to
project.yaml. Per-run tweaks stay here: right-click a run for Edit run.... Anonymization is a processing option in Inference Settings... like everything else.
Press ▶ Run on the project card to process the batch. The output panel (bottom right) has four tabs:
- Log -- the line-by-line trace of the batch.
- Charts -- per-run phenomena charts for a selected run.
- Live -- a live dashboard of gaze statistics and phenomenon events while a run is processing.
- Output CSVs -- a read-only viewer over a run's event and summary CSVs.
For the full study workflow -- preflight, running, resume, outputs -- follow the Run a Study tutorial.
Video File mode (quick analysis)
For a fast look at a single recording with no project and no metadata, switch to Video File mode:
- Browse... to the file, or drag the file onto the tab.
- The output folder is prefilled next to the source (editable).
- Press Analyze.
Live charts fill the left pane while it processes, and the output folder gets the same CSVs a project run produces -- because both modes use the same engine and the same Inference Settings, the numbers match a project run out of the box.
🎬 Demo coming soon -- SHOT:quick-analysis
Drag a clip onto Video File mode, the output folder auto-fills, press Analyze, live charts fill the left pane.
Camera mode
Camera mode records and analyzes live from a webcam:
- Refresh lists your cameras by name. Enumeration happens on demand when you press Refresh -- by design, not at startup.
- Optionally fill the Session details (participants, session, notes) so an ad-hoc recording still lands with proper metadata.
- Start Camera records and analyzes live; Stop finalizes the outputs.
A camera quick-run writes a <run_id>_session.yaml sidecar next to its outputs.
That sidecar carries the session's metadata, so a recording captured this way can
be imported into a project later rather than being a dead end.
macOS camera permission appears on Refresh
Because MindSight only enumerates cameras when you press Refresh, the macOS camera-permission prompt appears there -- the first time you press it -- rather than at launch. If the camera list looks empty, check System Settings > Privacy & Security > Camera and confirm MindSight is allowed.
Two prompts worth knowing
- Unsaved study setup. If you change study setup and try to leave without saving, MindSight asks first so you do not lose the change.
- Zero captured frames. If a run ends up with no frames captured (a dead camera, an unreadable file), MindSight warns rather than writing an empty output.
See also
- Projects and sessions -- building and managing projects.
- Inference settings and tuning -- the settings all three modes share.
- Run a Study tutorial -- the full study walkthrough.
- Understanding the outputs -- what the CSVs contain.